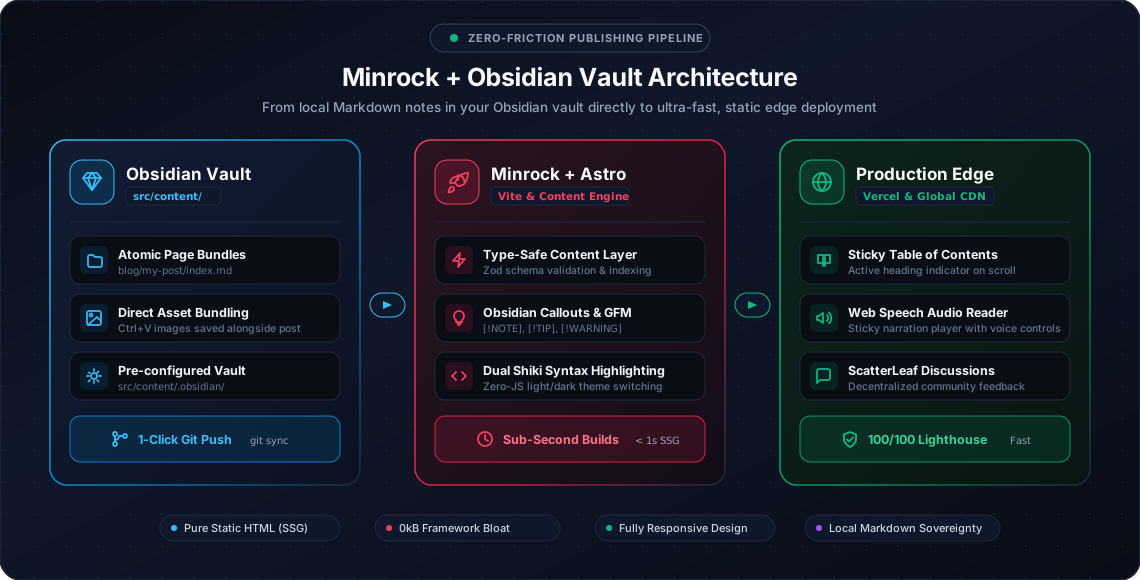
One of the foundational architectural goals of Minrock is to eliminate the friction between private note-taking in Obsidian and public publishing on the web.
Instead of dealing with proprietary headless CMS services, cloud databases, or slow web dashboards, Minrock treats your local Markdown repository as the single source of truth. By combining Minrock with Vault CMS (GitHub), your src/content/ directory transforms into a dedicated desktop publishing studio.
Which Path Should You Follow?
Depending on your goals and familiarity with Obsidian, choose the path that best suits you:
Step 1: Running the Command-Line Installer
In the root directory of your Minrock project, execute the official Vault CMS installer:
npx create-vaultcmsThis command inspects your workspace and installs the curated suite of Obsidian community plugins inside src/content/.obsidian/.
Step 2: Opening the Vault in Obsidian
Launch Obsidian on your computer:
- Click “Open folder as vault” (or “Open”).
- Navigate into your Minrock project directory and select the
src/contentfolder. - Trust the author and enable community plugins when prompted.
The Vault CMS Setup Wizard modal will appear automatically on your screen.
Step 3: Calibrating the Setup Wizard for Minrock
The default Vault CMS tutorial is built around general themes (like Axis), which often use flat Markdown files (blog/post.md) and generic property names. Minrock, however, uses an Atomic Folder-Based Page Bundle architecture and strict Zod schemas.
Here is the exact field-by-field mapping required for Minrock:
| Wizard Step | Setting Name | Minrock Value | Why This Matters |
|---|---|---|---|
| 1. Welcome | Setup Mode | Get started |
Never select community presets (e.g. Slate, Chiri), as they overwrite Minrock’s custom layout and styles. |
| 2. Detection | Project Root | ../.. |
Points 2 levels up from src/content to find your package.json and astro.config.mjs. |
| 2. Detection | Extended Types | Disabled | Minrock uses standard Markdown and MDX; raw data files are not needed. |
| 3. Content Type | Type Name | Blog |
Matches your Astro content collection declared in src/content.config.ts. |
| 3. Content Type | Folder | blog |
Directory path inside src/content/. |
| 3. Content Type | File Organization | folder (Folder-based) |
Crucial: ensures every post is generated as blog/<slug>/index.md. |
| 3. Content Type | Index File Name | index |
Matches Astro’s page bundle convention (index.md). |
| 3. Content Type | Link Base Path | /blog/ |
The public URL prefix for reading posts. |
| 4. Frontmatter | Title Property | title |
The article’s main heading. |
| 4. Frontmatter | Date Property | pubDate |
Important: Minrock uses pubDate (not date) formatted as YYYY-MM-DD. |
| 4. Frontmatter | Description | description |
Concise meta summary used for SEO and OpenGraph cards. |
| 4. Frontmatter | Tags Property | tags |
List of tags for categorizing articles. |
| 4. Frontmatter | Draft Property | draft |
Logic: true-draft (marking draft: true hides the post in production). |
| 5. Attachments | Handling Mode | Same folder as current file |
Directs Ctrl + V pasted screenshots into the post’s own folder. |
| 8. Deployment | Target Platform | Vercel (or your host) |
Prepares deployment hooks. |
| 9. Git Setup | Git Integration | Optional / SSH | If your repo is already authenticated with Git, you can skip token input. |
Step 4: The Page Bundle Architecture Explained
Why does Minrock insist on the Folder-Based (Page Bundle) pattern over flat Markdown files?
src/content/blog/
├── connecting-obsidian-vault/
│   ├── index.md             # The article text and frontmatter
│   ├── wizard-step-3.png    # Screenshot pasted via Ctrl + V
│   └── architecture.svg     # Vector diagram
└── getting-started-with-minrock/
    ├── index.md
    └── cover.jpg
4.1 Seamless Inline Previews in Obsidian
When you write in Obsidian and insert an image via standard Markdown (), Obsidian resolves files relative to the current note.
If images were saved in an external public/images/ directory outside the vault, Obsidian’s live editor would display a broken image icon. With page bundles, the preview renders instantaneously both in Obsidian and on your live website.
4.2 Zero Orphaned Media Files
In long-running technical blogs, deleting an obsolete article often leaves dozens of forgotten screenshots cluttering public/. With page bundles, each article is completely self-contained. Deleting the article folder cleanly cleans up all associated images.
4.3 One-Click Paste Workflow (Ctrl + V)
To make sure Obsidian always places pasted screenshots right next to your note:
- Open Obsidian Settings (
Ctrl + ,). - Navigate to Files and links → Default location for new attachments.
- Select “Same folder as current file” (or type
./in the subfolder box).
Step 5: Frontmatter Template for New Posts
When you create a new note in Obsidian (or via Ctrl + N inside the Blog collection), the frontmatter will look like this:
---
title: "Your Post Title Here"
description: "A clear, compelling summary for readers and search engines."
pubDate: 2026-09-16
tags: ["engineering", "architecture"]
draft: false
---
When saved, Minrock’s Astro engine automatically generates the clean route at /blog/your-post-title-here/.
Step 6: How to Update Community Plugins in Obsidian
A frequent question regarding pre-bundled vaults is: “What if the plugins become outdated?”
Upgrading community plugins in Obsidian never requires terminal commands or touching git submodules:
- Open Obsidian Settings (
Ctrl + ,orCmd + ,). - Click Community plugins in the left sidebar.
- Click the “Check for updates” button at the top.
- Click “Update all”.
Obsidian fetches the newest releases for Vault CMS, Astro Composer, and Obsidian Git in seconds while preserving all your calibrated configuration files (data.json).
Step 7: Publishing to the Web via Git
Because Minrock is a pure Static Site Generation (SSG) engine, publishing is as simple as pushing your Git commits:
- Inside Obsidian (1-Click Automagic): Click the Git Push / Up Arrow (
↑) icon in Obsidian’s bottom status bar (or runCtrl + P→Git: Push). Obsidian automatically drafts the commit message and pushes to GitHub without opening a terminal or typing any commands. - Via Terminal:
git add .
git commit -m "feat: publish new technical article"
git push origin main
Your hosting provider (Vercel, Cloudflare Pages, Netlify, or GitHub Pages) detects the push, runs npm run build, and your article is live worldwide within seconds.
Step 8: Video Walkthrough
To see the installation process in action, watch David Kimball’s setup walkthrough below. While the video uses the Axis theme as a reference, you can follow along visually and simply use the Minrock-specific fields from our table in Step 3:
Happy writing! If you encounter any questions while setting up your Obsidian vault or configuring custom fields, share your experience in the comments below.
🍃Discussion & Notes
Iframe-free native comments powered by ScatterLeaf.